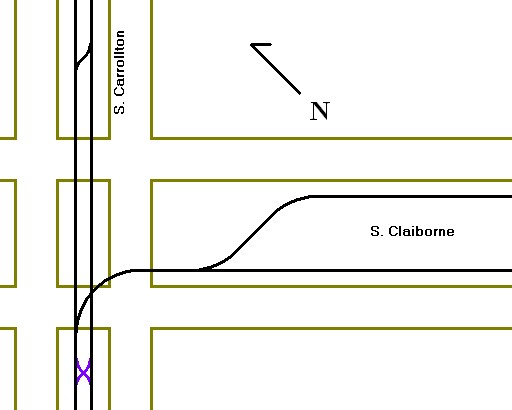
This is a diagram of the trackage at the intersection of S. Claiborne with S. Carrollton. It is not drawn to scale, but is intended to suggest the general layout. Tracks are shown as black lines, street and neutral ground curbs as green lines. The tracks shown in blue were added about August 1952. This is the configuration of crossovers usually found in reports of the period (1940s), although the author has seen at least one such report with a crossover on S. Carrollton near what would be the bottom edge of this diagram. While such a crossover would make travel from Carrollton Station to S. Claiborne more convenient than this diagram shows, other reports do not confirm it. Carrollton Station is off the bottom edge of this diagram, some blocks away. Assuming this diagram is accurate as to the position of the crossovers, travel from Carrollton Station to S. Claiborne must have involved going across Claiborne to the crossover on Carrollton, switching back and crossing Claiborne again, then changing ends and taking the broad curve into Claiborne. (Return to the station would of course have been much simpler.) In wondering why such a track layout would have been tolerated, it should be remembered that in earlier days, the S. Claiborne line was housed at Arabella Station, and the connecting curve between Carrollton and Claiborne would have been used only rarely. By the time Arabella was stripped of its rails (1948), it was clear that the assignment of S. Claiborne cars to Carrollton Station would last only for a few years. It should also be noted that in August 1952, the St. Charles line was cut back to this intersection, and a new double scissors crossover, still in use today, was installed on S. Carrollton as shown in blue. That would have made the connection from Carrollton Station to the S. Claiborne line more convenient, but S. Claiborne had then less than six months to survive as a streetcar line.